Thursday, September 29, 2011

Etsy Shop Profile: Black Cat Hill


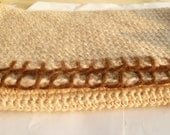
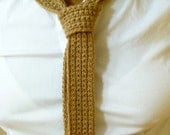
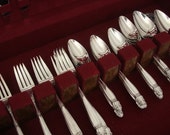
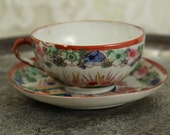
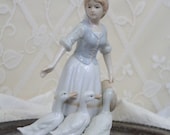
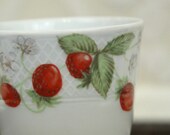
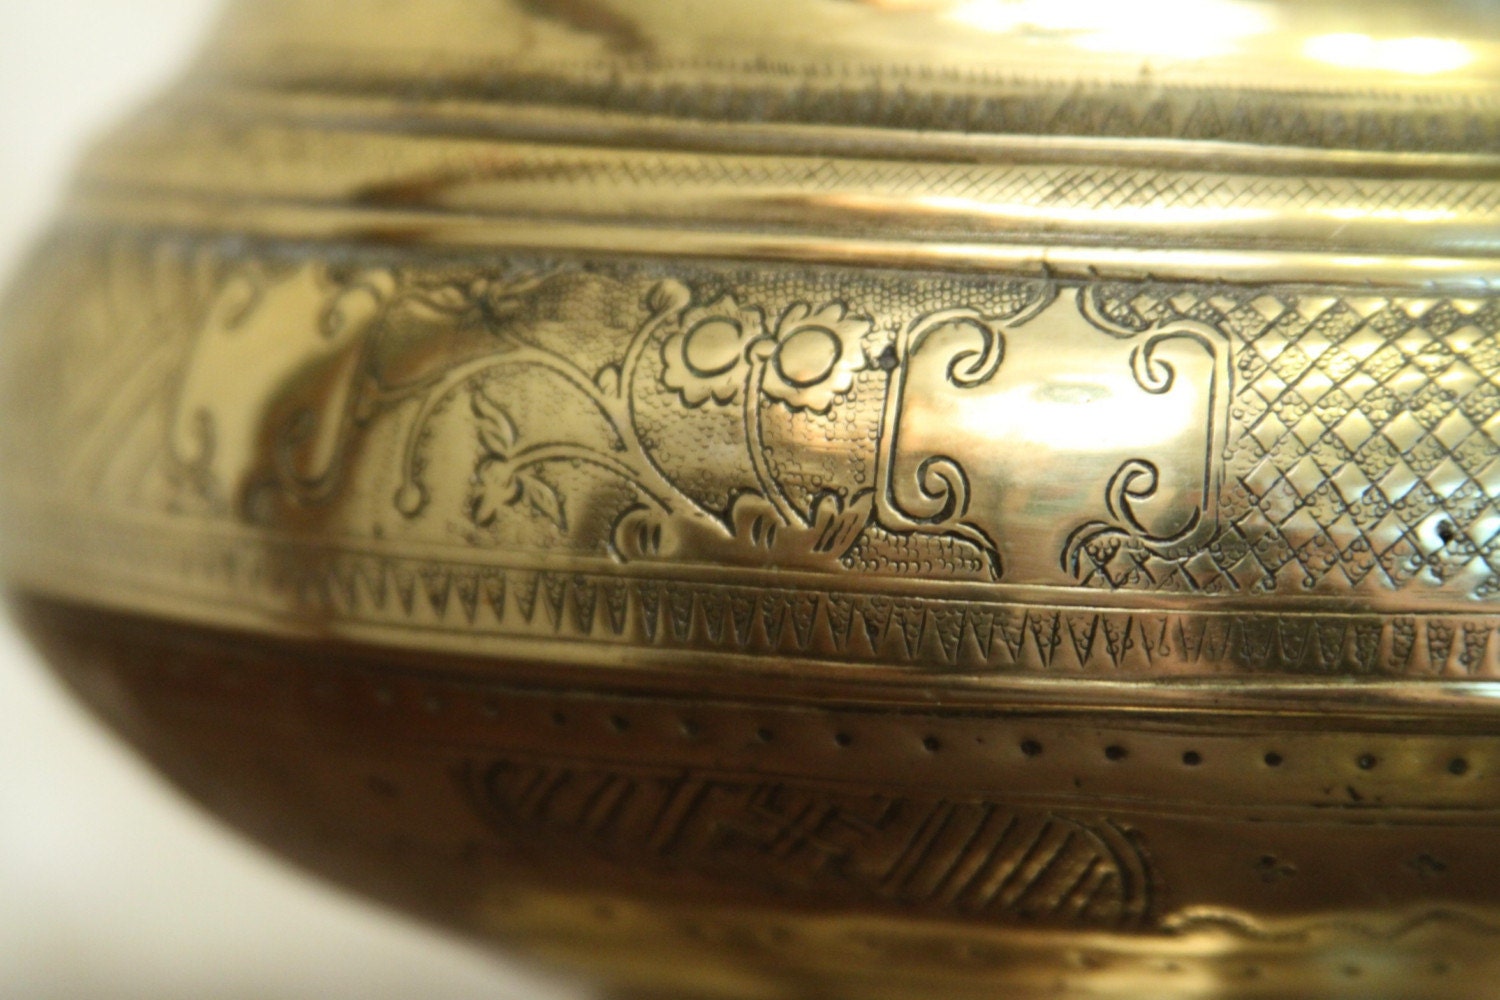
Today we get to say hello to Delaney of Black Cat Hill an Etsy shop that sells vintage items.  Since I'm so into vintage right now, I've been enjoying browsing through her beautiful shop.  It would be difficult to choose one favorite item, so I chose five!  Check out these photos!

1. What kind of items do you carry in your etsy shop?   I'm instantly drawn to tarnished silver, chippy paint and rusty wrought iron. I love things that really show their history, scratches, chips, and all. When things are not only beautiful and unique, but also useful everyday, I have a hard time letting it go. We hunt for things like farmhouse decor, old books, and tarnished silver. My father and I also make rustic style furniture and signs from reclaimed wood. 


SALE --  Beautiful JAPANESE tea cup and saucer hand painted GEISHA GARDEN themePorcelain figurine of woman with geese - pale blue and white2. What are some of your favorite designs or items?   Sometimes, when I find something I really love, I keep it for myself. I'm sure every vintage seller does this. I'm currently collecting white dishes and pretty much anything to do with birds. But I go through phases, so who knows what I'll be after in a few months. ;) 

3. How would you describe your creative process?  Vintage selling doesn't allow for much creativity, but I also work in photography and multi media artwork. I love that I can find unique old things and use them as props for a shoot. 

4. Who has influenced your art the most? In what way(s) did this person influence you?   I was raised by artists, and I grew up around artists so the influences are probably endless. Growing up, my dad used to give me cash for birthdays and a ride to the local thrift shops, so that's probably where my love/obsession for all things vintage comes from. But it was my mom and grandmother who taught me how to spot an estate sale from a mile away. ;)

5. What does "handmade" mean to you?  In a word, unique. Even if an artist tries to duplicate an item, it will never be just as the original. Handmade means you can see the craftsmanship and design that goes into something. It means that my handmade item is the only one in the world. 

6. Is there anything else you'd like others to know about yourself or your shop?   Mostly that Black Cat Hill isn't my only shop, and that I'm constantly delving into new things. I also love vintage clothing (AnotherSeason.etsy.com), and art is a huge part of myself. I started with photography (DelaneyLaFae.etsy.com), but I also can't help but explore early styles of art (WolfPackTribal.etsy.com). And just because I haven't totally worked myself crazy, I'm opening a soap shop later this year (SylvaPagana.etsy.com). 


Brass bowl with lid - large decorative bowl on pedestal with lid with lots of intricate engravingLeave a comment to say hello to Delaney and click here to visit Black Cat Hill.

Wednesday, September 28, 2011

Tassels Times Two

Part two of my DIY tutorial on making tassels!


Today is about embellishing the basic tassel we made yesterday.  You can use any manner of items to embellish your tassel.  I've used ribbon, slivers of cut fabric, beads, cording and charms.  Search through your embellishments for unusual items.  Attaching the embellishments will be easy once you learn the basics.


To add your embellishments you will need a needle, thread (either match the color of the tassel or use clear nylon thread) and a thimble or small needle nose pliers.


Let's begin by discussing the parts of the tassel which, I should add, are of my own terminology.  The very top string is the hanger.  It holds all the threads together to form the head so that you can fold and tie on the horizontal thread, or waist.  The loose threads at the bottom are the drop.


The easiest embellishments to add are the longer ones, such as ribbon, cording, etc.  In the tassel at right, I added the ribbon when making the basic tassel by simply laying the ribbon down first, then adding the thread.  When I folded the tassel to tie on the waist, I made sure to fold with the ribbon on top.  


To add ribbon after the basic tassel is made,  measure the drop and double the number.  This is the length you'll need to cut the ribbon.  Find the center of the ribbon and finger press.  Open the ribbon and tie it on with the fold at the waist.  Fold the ribbon down and wrap the thread around it so that it covers the fold and holds the ribbon down.  And there you are!


Now let's add a few beads.  Thread your needle with about 18 inches of thread and knot both ends so that the thread will be doubled.  Slip the needle into the tassel from the bottom of the waist inside the threads of the drop so that the knots are buried.  The needle should come out of the tassel through the waist.  


Load some beads onto the needle and slide them along the thread close to the tassel.  Now add one small bead and slip the needle back through the first set of beads and pull through.  The beads need to touch the tassel waist but do not pull too tightly or they will stick straight out rather than hang down along the drop of the tassel.  Make a small knot at the base of the beads.


You can add as many strings of beads as you want by simply running the needle through the waist to where you want the next string and repeat the process.  


In the picture below, I added short strands of fat beads between long strands of slim beads.  In the black and white tassel, I mixed thread of both colors then added striped beads to the sides and inside the tassel so that they just barely show below the drop.


Have fun making and embellishing your tassels. 


Send photos of your finished to tassels to mary.marcotte@gmail.com, and I'll post them on my blog.  It will be fun to see what you come up with and the rest of us will find inspiration in your work!


Please leave comments letting me know how you like this tutorial or if there are parts that are confusing!


Thanks for visiting!


Happy Quilting,
Mary


Tuesday, September 27, 2011

DIY Tassel Tutorial

Since I don't have any real sewing to write about, and since I've been meaning to write this tutorial for  a while, I guess I'll just get to it now.  


Making a tassel is really quite easy.  All you really need is a good heavy-weight thread, such as crewel thread.  It's used for embroidery and crewel work and is heavier than embroidery thread.  


Choose a color that will work well with your home decor, and you can use your tassel for any number of decorating projects: stitch, glue or tie it on to

  • pillows
  • curtain tie-backs
  • Christmas tree 
  • wreath
  • teapot
  • cup 
  • photo frame
  • book mark
  • cell phone
  • zippers

Once you've chosen your thread, you might gather a few other items to embellish your tassel: ribbon, beads, cording, and thin fabric strips.  You can stop once the basic tassel is complete or continue and add some of these embellishments to the tassel.  Today's tutorial will cover the basic tassel.  Tomorrow I'll tell you how to add beads, ribbon and other embellishments.


Step 1: Slide the paper rings off the skein of thread but do not unroll the thread.  It's easiest to handle while still twisted and is pre-measured.  Your tassel will be half the length of the skein.   Gently unwind about 12 inches of thread and cut off.  Cut this piece in half.  Measure the skein and find the center, then tie one of the 6 inch threads very tightly around the skein at the center point.  


Step 2: Cut the threads apart at the folds on each end of the skein.  Fold the entire skein in half so that the center thread is on top of the tassel.  Tie the second piece of 6 inch thread around the tassel about 1/2 inch below the fold tying tightly.  Wrap the end of the thread around several times and tie off.  Use a needle or pin to tuck the ends into the center of the tassel.  Tie the two ends on the top of the tassel so that you have a hanger.  Snip off the extra edges.


You now have a basic tassel.  Tomorrow we'll add beads, cording, or ribbon to the tassel.

Monday, September 26, 2011

Done and Almost Done!

Yeah!  Got that quilt top for Adrienne finished today.  I'll load it on the long arm tomorrow afternoon and, hopefully, make a few quilting stitches.  I still haven't decided on a quilting motif, but I do have a few ideas running around in my brain.

Since I had the chance to spend some time with Audrey, I asked her about her quilt and what she would like.  Pink, baby blue and something else was her answer, so I mentioned that I have some plaid fabrics with her colors that came from Grandma's stash.  She was very excited about it coming from Grandma.  

Unfortunately, I'm not so sure it has the right colors, after all.  The pink is really coral and there's way more green than blue.   I guess I remembered it wrong.  So, I now have to wait until I get the word from Angie that Audrey still wants this fabric.  
That may take a while. 
  In the meantime I will quilt Adrienne's quilt, 
then work on a quilt top that I found at Mom's. 
It's a bit unusual so figuring out a good quilting pattern may be a challenge.  I certainly would like a few suggestions.  
Do you think that I should focus on the cross or the circle?  

Sunday, September 25, 2011

Y'all come back

My sewing table
Since I didn't get much time to sew today, I thought I'd add a few more photos from the studio.  I took these last week and posted the first set of photos here.  I still have a few photos and hope you enjoy seeing the rest of my studio.


A small seating area.  No curtains on the windows yet!
These last two are of the addition.  In fact, the one with the long arm machine still has unpainted walls and floor, so it must be from a month or so ago.  All of the walls are the same now: brown bottom and beige top.  I still need to add the fleur de lis border, some drapes, and some cushions on the rocker.  That will come in time, I hope.  
The long arm


It's still a work in progress and I'd rather be sewing than decorating and cleaning up.  I must say, however, that painting the floor has definitely made a difference in the dust. I can easily sweep and mop and the dirt/dust comes right up, something it didn't do with the plain concrete.  


Please leave a comment and tell me what you think.  I love suggestions!  A decorator, I am not!

Saturday, September 24, 2011

Back to the Ballerina

After a brief stop to work on a dress for Jenny, I got right back on that little ballerina quilt.  I was hoping to get the blocks made today and sew the strips up tomorrow.  I probably won't make my goal since I've got a bridal shower to attend in the afternoon.  


I did get some blocks stitched up, however.  This cute little ballerina print is the focus fabric.  I tried mixing it with the purple that matches the little purple tutus so well, but it was just too overwhelming.  So I had to rethink my plan.  


I tried a red that matches the red tutu perfectly, but the pink is so light and the other colors so dark that it just doesn't work.  Scratch the red.


I tried a bright pink and played for some time with the arrangement.  Nothing seemed to work: the purple just overpowers the print.  Finally I had an idea.....to put the purple on the outside of quilt.  


 I like this arrangement much better.  I am fairly sure that the purple will be the drop of the quilt so it will be even less overpowering.  


I realized just in time that I needed to cut some of the purple blocks a different size to accommodate the white strip on the outside.   I really want the quilt to finish just like this with a white border.  Luckily I still had a few strips of uncut blocks.  

Each of these small pictures is a single block.  First, I cut a long strip of the center of the block and two strips of white and sew the strips together.  Then I cut the blocks apart.  It's much faster than sewing individual blocks.   


I had cut most of my purple blocks when I realized that I'd need a smaller block on half of the purples.  I could, of course, cut them again then sew on the third strip of white, but that's giving myself more work.


At any rate, I figured it out in time and managed to get all the blocks complete.  Half are on the design wall waiting to be sewn into strips and the other half are on the worktable waiting their turn on the wall.  I definitely need to put the blocks on the design wall.  It would be very easy to confuse them and sew something wrong, especially since the focus fabric is a one-way design.  I don't want these cuties dancing upside down!


What do you think?  I'm not especially crazy about it, but I think it works and I also think Adrienne will like her quilt.  I'm thinking of quilting some ballet terms into the blocks but I haven't decided quite yet.  I've seen some great quilting designs that I I want to try, so they may make the cut, especially since my worry is that Adrienne will outgrow the ballet theme.  If I include a more grownup quilting motif, she may use the quilt longer.  

I am having fun with it and love the fast blocks.  I've learned a few things as well and may reuse this block pattern for a scrap quilt later.  It's fast and fun and I like the wavy pattern that it makes from a distance.


Y'all are such sweet followers!  Thank you to those who voted on Picket Fence.....I now have the 100 votes I was hoping for--up one more page!  Of course, the #1 blog has 6,000+ votes.  Can you imagine?  

Friday, September 23, 2011

Come In and Visit

Here are a few pictures that I took of the studio last week, when it was a bit picked up.  
Since then we've added a few more things and I've made something of a mess.  Hope you enjoy.

The Studio Cutter

The Stash!

Small items for garment sewing

Thread

The cabinets that Richard recycled for me.

My Bernina 440 QE on the shelf Richard built when he built the studio.

All of my stuff on the right of the Bernina, the Juki serger, and the computer.

The rest of the crafting stuff.  These drawers are all  labeled.

A small vintage cabinet from Richard's grandmother's home.
Please take a moment to click on the Picket Fence button on the top right of the screen.  I've been getting a few votes lately and am almost 100 votes!  Yes, I'm a little excited about that.  It just shows that a few of my followers and visitors appreciate my work....and that's a sweet thing to know, indeed!

Thursday, September 22, 2011

Etsy Shop Profile: Kouture Crochet


Today we have the opportunity to meet Karia of Kouture Crochet an Etsy shop that carries handmade crocheted items.  Karia is quite an inspiration.  Read her feature and visit her shop where you'll find some beautiful crochet items for Christmas gift. Ten percent of sales go to the Clifton (NJ) Animal Shelter to help care for abandoned animals.
Where/when did you learn to crochet?    I learned when i was 14. My mother taught me at home.  

Merino Wool Scarf, Men's, Women's, Luxury Green Scarf, Men's Scarf, Charitable DonationWhat are some of your favorite designs and yarns?   I really prefer simple designs. Simplicity in design is also part of what creates a luxury product. The challenge with working with simple patterns is that any faults, errors and imperfections stand out like a soar thumb. As a result of this, much care must be taken to maintain even tension and stitches. A simple well fitting tailored suit will indeed cost much more than an off the rack trendy outfit. The challenge is the same for crocheted works. In order to meet this challenge I had custom wood crochet hooks made that are perfect for my own hands that help me maintain even stitches throughout. The result, I think is well worth the effort. I love the art of the design challenge and the production challenge. It is why designs are simple.


Any THREE Merino Wool Cup Sleeves, Crochet, Custom Handmade, Charitable DonationYou use only natural yarns and strive to make luxurious items. Explain the difference between natural and other yarns.  Synthetic yarns are great for a number of uses. There are usually far less expensive than natural yarns. Acrylic yarns are made from petroleum based plastics, so they are very hard wearing. Caring for synthetics is often a simple matter of which setting to use on your washer/dryer at home. Natural fibers require more attention and careful maintenance. Careless maintenance of natural fibers can cause felting, shrinking or worse. However, even the softest “Baby” acrylics lack the softness of some of my favorite natural fibers. Every natural fiber has different qualities, but in general there are more breathable, are better at retaining heat, are lighter in weight than synthetics. Alpaca is lighter and offers amazing warmth at a faction of the price of other natural fibers while still being wonderfully soft. Alpaca is also immensely strong. I use the scarps from my retail projects to make cat toys that don't fall apart. Cashmere is lighter still but offers as much warmth as alpaca. Notably cashmere is slightly softer than alpaca and has a drape that makes it perfect for luxury sweaters. There are many more fibers wool, silk, camel, quvot and many more. 
Large Blanket, Crochet, Contrast Border, 50in x 60in, Pure Alpaca, luxury blanket, Made-to-Order, Charitable Donation
How would you describe your creative process?   I design every pattern myself. I do not use templates or store bought patterns. My process is at once a free flowing process and a historical and intellectual process. In designing my ties, I studied ties and cravats. I believe that if I want to create something that is timeless i need to know the styles that have passed the test of time. I take that information and then begin the design process. 

What does "handmade" mean to you? Is there anything else you'd like others to know about yourself or your shop?  I have Dandy Walker Hydrocephalus, a congenital brain malformation. Even though this prevents me from driving or having a regular 9-5 job, I started this shop in hopes of both following my passion as an artist and as a means to support myself without depending on outside or government aid. 

Camel Skinny Tie, Pure Baby Camel Hair, similar to Knit Ties, Exclusive Tie, Charitable DonationI have been crocheting for 17 years. Often crochet is seen as a source of work with products far removed from luxury. My goal is to create exceptional crocheted items that are luxurious yet subtle, simple and refined. I use only the finest 100% natural fibers. The result is a marriage of the wonderful and unique texture of crochet with the refined quality of the couture houses of Paris high fashion.   I am always looking for new and exciting fibers to make luxury products. Today I scored some wonderful hand dyed 50% alpaca/50% merino wool that I am going to use for some ties! 
Also I have been donating 10% of the proceeds to a number of charities. Currently 10% of proceeds are donated to the Friends of  Clifton Animal Shelter where I adopted my two lovely cats.


Say hello to Karia here or visit her Etsy shop Kouture Crochet.  Her beautiful crocheted items are already marked at a great price but knowing that part of the money also helps a wonderful charity just adds to the spirit of giving, don't you agree.

Tuesday, September 20, 2011

Ballerina Quilt

Now for the next quilt for my sister's grandchildren.  
Her little Adrienne is into dance and ballet.  
She wants a ballerina quilt, for which I found this fabric.  

I really like the looks of the little girls in their leotards and tutus.
Their little pointe shoes are just too fun.  
Hopefully, Angie will like the fabric as much as I do.  

I'm thinking of adding red and purple.  
I have a pretty purple from mom's fabrics that may work.  
I'm not so sure what red will do.  
So tomorrow I'll audition several fabrics to determine what will work with this fabric and the purple.
That is assuming that Angie will approve this as the focus fabric.
What do you think about purple and red?  
I'm a bit nervous about mixing them but they work so well in this fabric, don't they?


On a different note, I found out today that the class I'm teaching for Quilt Campus met the minimum number of students, which means the class will begin on October 22.  If you're interested, there's still time.  We'll be working on this stained glass quilt and will take about three weeks from start to finish.  I certainly hope you consider joining in!  I'd be thrilled!